
Looking for help?
Find answers to your questions
- How do I increase the flow on my Artos F402-2 tub filler?
- Why are open waterfall tub spouts not available in matte black?
- Why does my shower arm escutcheon not fit on the shower arm?
- Why is the spout on my Artos F501-8-1 faucet wobbly or leaking?
- Is a rain showerhead right for me?
- How do I install a shower body jet with a male connection?
- How does the Artos 6" square rain showerhead work?
- How does the Artos 12" square rain showerhead work?
- How does the Artos 6" round rain showerhead work?
- How does the Artos 8" square rain showerhead work?
- How does the Artos 8" round rain showerhead work?
- How does the Artos 10" square rain showerhead work?
- How does the Artos 10" round rain showerhead work?
- How does the Artos multifunction shower head work?
- How do I remove the flow restrictor from my hand held shower or shower head?
- How does the Artos 12" round rain showerhead work?
- How do I replace the cartridge on my Artos F802-2 tub filler?
- How do I install a flow restrictor for my hand shower?
- Can I install my towel dryer with the heating element facing up?
- Can I reposition the heating element from my Artos towel dryer?
- Why is my hydronic towel dryer leaking?
- How do I clean my towel dryer?
- How do I hang towels on my Artos Cadiz towel dryer?
- How long are the mounting brackets for Artos towel dryers?
- How do I top off my fluid-filled towel dryer?
- What are the differences between plug-in and hardwired towel dryers?
- Why do hydronic towel dryers need to be on a closed loop system?
- How hot should my towel dryer get?
- What comes included with my Artos towel dryer?
- What side of Artos towel dryers is the heating element installed on?
- What are Artos towel dryers made of?
- How do I replace the heating element for my Artos towel dryer?
- Why is the timer for my towel dryer not working?
- What is water hammer and how do I fix it?
- Why am I unable to turn the thermostat handle on my valve?
- How far should I open the service stops on my thermostat valve?
- How does the F962VO valve work?
- How does the Artos F943-VO valve work?
- Why is the diverter handle hard to turn on the Artos F943-VO valve?
- Why is my Artos F943-VO valve leaking from the diverter cartridge?
- How do I troubleshoot my Artos F943-VO valve?
- Why is the water not hot enough from the Artos F904A-VO valve?
- How to install, calibrate, maintain, and service your Artos F904A-VO valve
- How does the Artos F903A-40VO valve work?
- Has the diverter cartridge for the Artos F943-VO valve changed?
- Why are the spindles on the Artos F943-VO valve too long?
- How do I recalibrate my Artos thermostat valve?
- How do I replace the cartridges on my Artos F943-VO valve?
- How do I install an upgrade kit for my Artos F904-VO (pre-2014 model)?
- How do I increase the water temperature on my Artos F904A-VO valve?
- Why has my Artos F904A-VO valve cartridge separated while removing it?
How do I install an upgrade kit for my Artos F904-VO (pre-2014 model)?
If you suspect that your valve was installed before 2014 and you're experiencing issues with your hot water supply, it's important to determine if you need an upgrade kit. This article will guide you through the process of identifying whether your valve falls into this category and explain the steps to upgrade it effectively.
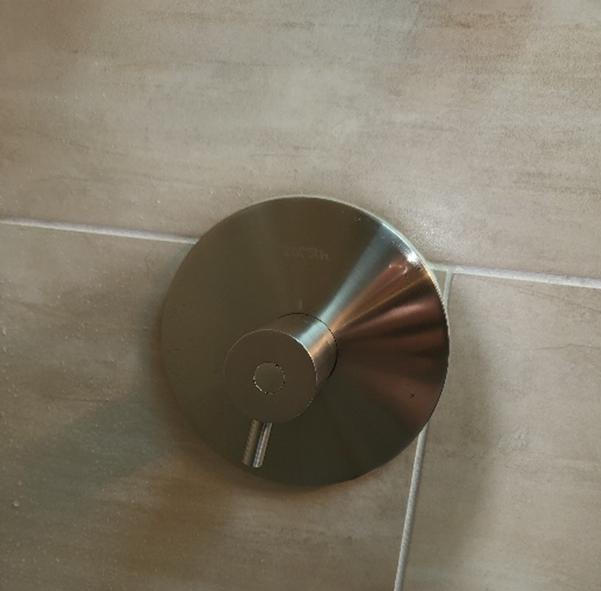
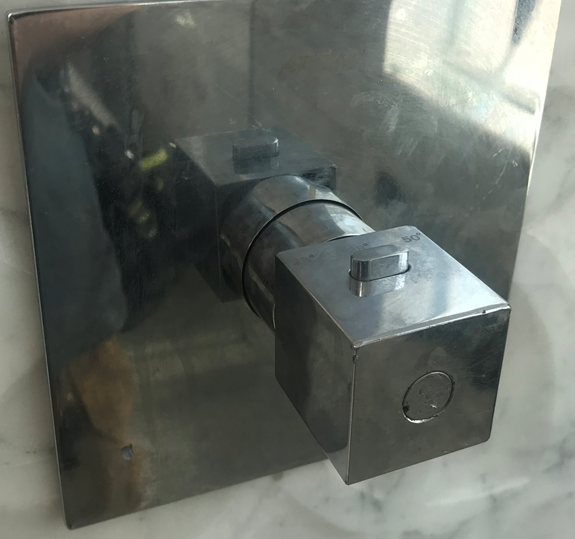
Identifying a Pre-2014 Valve
To check if your valve was installed prior to 2014, inspect the handle closely. If it features a circular set screw cover on the front, it's likely an older model. Examples of such handles are shown below:
Do I Need an Upgrade Kit?
If you have identified your valve as a pre-2014 model with the circular set screw cover, it's recommended to consider an upgrade kit. The kit includes a new cartridge designed to regulate and control water temperature effectively, addressing any temperature-related issues you may be experiencing.
About the Upgrade Kit
The F904-VO valve underwent significant upgrades in 2014, making the old cartridge unavailable for valves installed before the change. To facilitate the upgrade process, we have created a replacement kit that includes the following components:
- Replacement cartridge
- Screws for installation
- A new alternative handle, designed to match our current product line
Pricing
The cost of the upgrade kit may vary depending on the finish and shape of the handle included in the kit. Typically, the price ranges from $50 to $65.
Choosing the Right Kit
Selecting the appropriate kit is crucial. Determine your valve's finish and shape of the handle, and then choose the corresponding option:
For Chrome Finish:
For Brushed Nickel Finish:
Square Handle in Brushed Nickel Kit
Round Handle in Brushed Nickel Kit
Installation Steps
To upgrade your valve successfully, follow these steps:
- Start by removing the plug to access a screw.
- Unscrew the screw and then remove the handle.
- Pull the trim plate off the wall.
- Remove the dress ring that becomes visible.
- Turn off the hot and cold water using the service stops.
- Carefully remove the old cartridge (it may be stiff).
- Insert the new cartridge using the provided screws as leverage.
- Remove the screws from the cartridge.
- Turn the water back on and test for water tightness.
- Replace the temperature ring and the chrome piece (which may feel loose).
- Reattach the trim plate using silicone to secure the pieces in place.
- The new handle attaches with a set screw on the underside.
- Tighten the set screw with an Allen wrench.
Video Tutorial
For a visual guide, watch our instructional video:
Purchasing the Upgrade Kit
To order the upgrade kit, visit the links below to explore the options available.
For Chrome Finish:
For Brushed Nickel Finish:
Square Handle in Brushed Nickel Kit
Round Handle in Brushed Nickel Kit
Updated on 16 Nov 2023